Statement Message
To update Statement Messages, look up an association in the Association Search box, click on the Communication tab, and select Statement Messages from the dropdown.

You’ll see something similar to the below on your page

In the Current Statement Message box, you’ll be able to see the Statement Message that is appear on your current, Regular Statement that is being sent to your Homeowners

At the bottom of the page, you’ll see a list of your Statement Messages.

The line with the globe icon next to it is the general, default message that will appear on all Statements of that type when there is not a custom message set for any given time frame. Clicking on the plus sign will display the message.

Clicking on the pencil icon will allow you to edit that message and the trashcan icon will allow you to delete that message.
To add a new Statement, click on the New icon and the Message window will appear.

Choose whether you want to enter a Regular Statement Message or a Late Statement Message.

In the Start Date and End Date fields, you will select the month that you want that Message to appear – if you want it to just appear for one month, select the same month for the Start and End Date fields.

As you are entering your Statement message, you will see a character count appear.
Click Create.
You can schedule Statement Messages in advance so that you don’t have to update it every month.
In the Billing Questions box, you’ll see the pencil icon that will allow you to customize the contact information that you provide for your residents.


If you click on the question mark in the orange circle next to Billing Questions, you’ll get an idea of how the information will appear.
Resident Search or Association Search
Go to mgmt.actionlife.com. If you are prompted to log in, use your full Action email address and your computer password.
You will then be brought to the home page of the Management App, where you need to decide whether you are searching for something Resident/Unit specific or just Association specific.
Note: You may not have the My Associations section, as that section will only appear if you are listed on the Client List for an association.
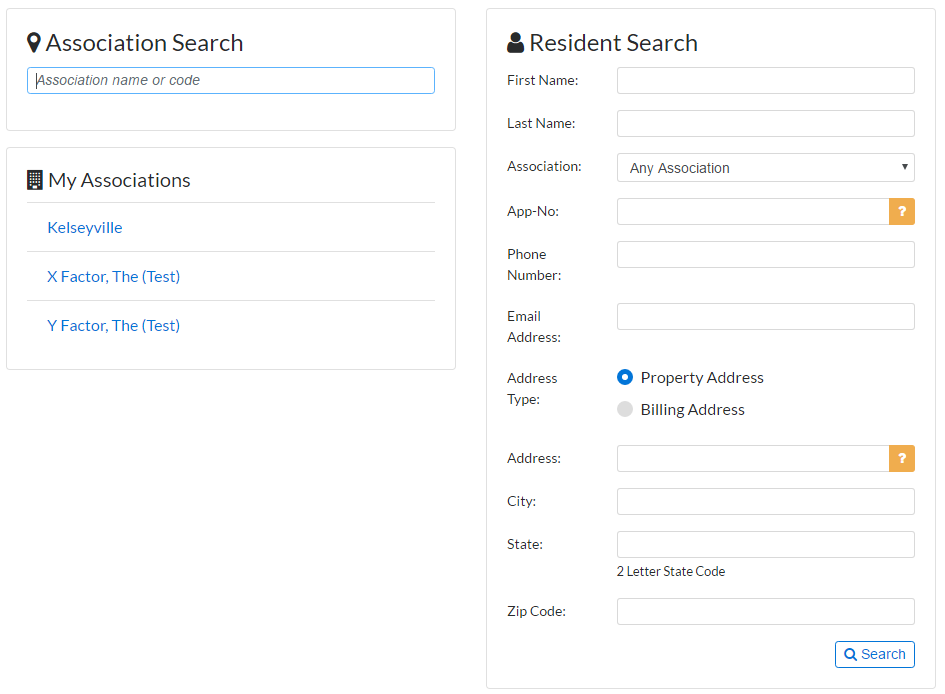
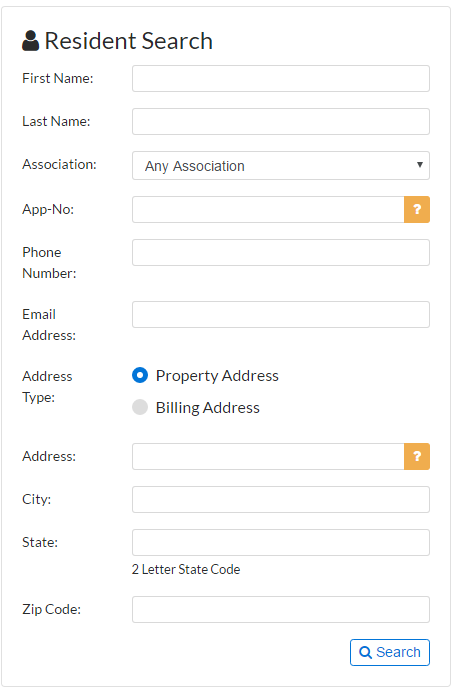
Resident Search
In the Resident Search section, you can search for a resident by name, address, unit number, and more.
Click here to view what additional tasks you can do within the Resident Search.
Association Search
By looking up an association, you will be able to get an overview of the entire association.
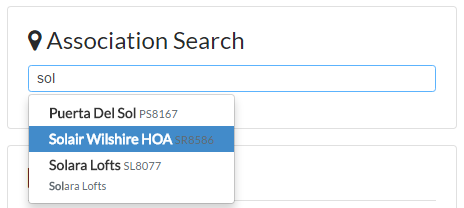
To pull up Association information, start typing an association name in the Association Settings box and select the association when it appears (if an association you should have access to is missing, submit a ticket to support@actionlife.com)
Associations under My Associations display based on your assignment on the Client List. If an association is listed there, you can click on it instead of searching for the association (if an association you should have access to is listed on the right hand side but you receive an “access denied” warning, submit a ticket to support@actionlife.com)
Click here to view what additional tasks you can do within the Association Search.
View Account History
Follow the steps below to lookup Account History in the Management App:
- Search for the resident you’re looking Account History for
- Select their name or address from the results.
- Go to the Accounting tab
- The Account History table will default to displaying ALL Account History items in 10 row increments
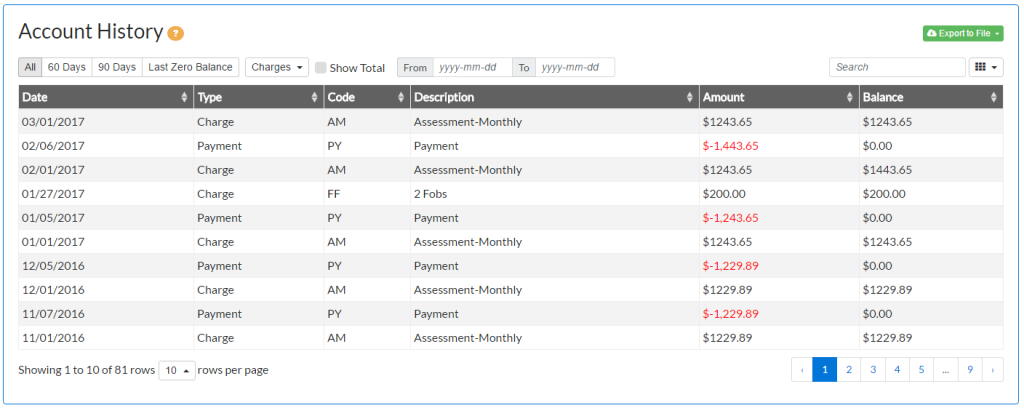
- You can adjust the date range the displays using the From/To fields

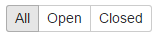
- There are buttons (All / 60 Days /90 Days / Last Zero Balance) to help you quickly filter based on the button name

- If you would like to view the Total, “check” the Show Total box.

- You can utilize the Search bar to search for information in any of the columns.
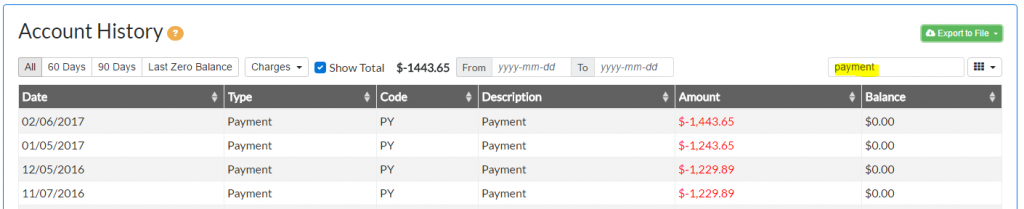
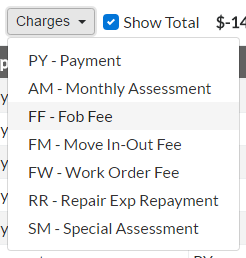
- You can use the Charges dropdown to just display specific types of charges
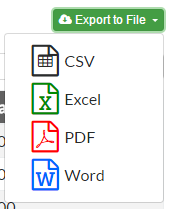
- Clicking Data Export will allow you to save and print the Account History
Looking Up Violation
Looking up a violation for a specific unit in the Management App is very easy. Follow the steps below:
- Search for the resident you’re looking for a violation for
- Select their name or address from the results.
- Go to the Violations tab.
- Find the violation in the Violations table

- By default the table will display ALL violations. If you would like to see only OPEN violations, select the Open butto
- The Search bar searches all of the table columns.
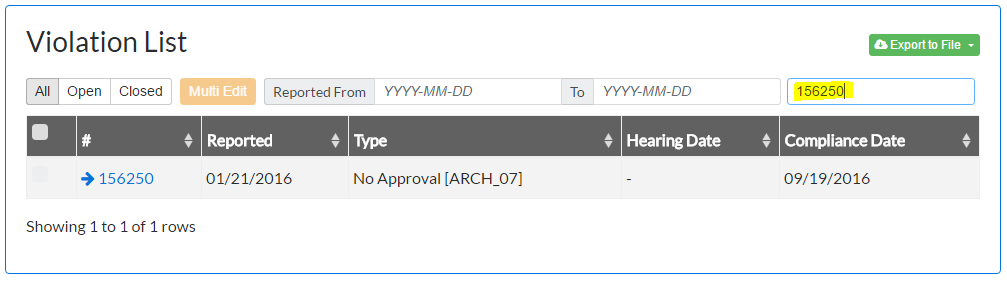
5. Click on the Violation number in the first column to see more information about the Violation

- Clicking on the Doc file image will download a copy of the letter that was sent
- Clicking the Print button will allow you to print the Violation window
Receive Miscellaneous Payment
Receiving payment using the Management App is very easy. If you’re receiving a payment for a miscellaneous charge only follow the steps below.
- Search for the resident you’re receiving the payment from
- Select their name or address from the results
- Click on the Accounting tab.
- In the Accounting tab, click on the “Payment Receipt” link (note that your Options section might have an AutoPayment button in the section below).

- In the Payment Receipt window select the option “Misc. Payment”.
- Select the payment description from the drop down menu and enter the payment amount.
- Continue step 5 for additional payments.
- Type the check number in the check number field, and click submit.
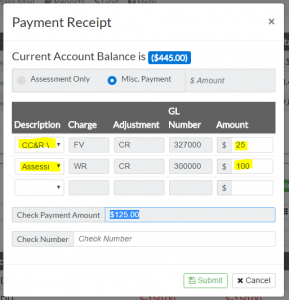
- At this point you can print a receipt for the homeowner and print the completed AR Form to submit to Cash Posting.
NOTE: Also look at Receive Assessment Only Payment